Thursday, January 31, 2013
One word: Try
This year, instead of coming up with a list of New Year's resolutions that I will undoubtedly forget by March, I'm participating in the One Word 365 challenge. This challenge asks people to choose one word that "sums up who you want to be or how you want to live. One word that you can focus on every day, all year long."
I first heard about this challenge from my friend Lisa, who chose the word "kneel." She beautifully describes how she wants to "kneel in prayer, kneel before God as a broken person, kneel before others with my heart wide open, kneel in service to those in touch of love and kindness, kneel before my writing to encourage others and encourage justice."
Gosh, just reading her words send shivers through me.
After a lot of thinking, I'm choosing the word "try." I don't want to live this year wishing for things to happen or hiding from life because I'm too afraid to fail. This year I'm going to push myself to step out of my comfort zone and try new things.
So, here's to trying, failing, and living.
*Gulp* We'll see how this all works out. Life suddenly feels very exciting and a scary all at the same time.
Would you like to join me in this One Word challenge? If you could choose one word to influence your life for an entire year, what would it be? Why?
(Keep me accountable, ok?)
Wednesday, January 30, 2013
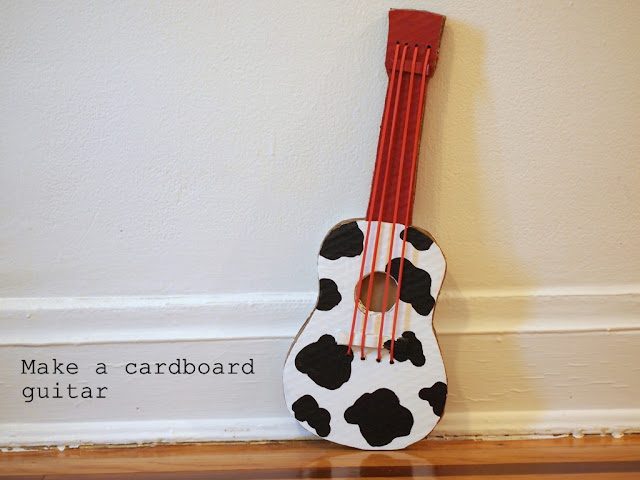
Make a cardboard guitar
Whenever I play the guitar, Baby Chuck seems keen to join in. He pulls on strings, turns the tuning keys, and inevitably drops picks (and possibly raisins- ick) into the body. I figured he'd like his own guitar, so I made him this black and white cutie. It's the size of a ukulele.
(Why cow print? Well, whenever we ask him "What does a cow say?" he responds "Mmm mmm." Then we always cheer because that's close enough for us.)
Want to make your own guitar? Read on!
(Disclaimer: I got the template and directions from Make It and Love It. They wrote a really comprehensive set of directions packed full of lovely photos. Check out their post for detailed directions and cute kid pics. I'm posting up this set of directions because I did things slightly differently.)
(Disclaimer 2: This project takes a long time. Crapting helps me to relax, so I didn't mind.)
- Exacto knife
- Aleene's tacky glue (you'll need something stronger than Elmer's, hot glue didn't quite work for me)
- Scissors
- Nice cardboard (no bends or stains) <-- crap
- Ruler
- Drill
- Paint, paint brushes, Mod Podge
- 4 jumbo 7 inch rubber bands (purchased at Staples)
- 2 paperclips (I used jumbo sized ones, but I think 1 inch ones would work too)
- heavy books
2. Glue together two of your full length guitar pieces. Now you have a nice sturdy base. (You don't want your rubber bands to bend the cardboard.)
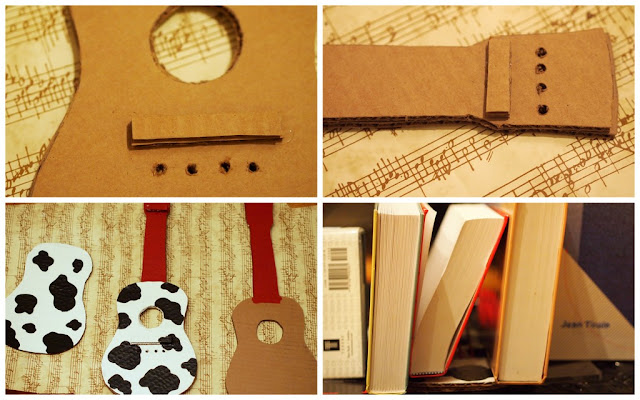
3. Cut out 4 rectangles out of cardboard:
4. Glue your two large rectangles, one on top of each other, about 1 inch below the cutout circles on your previously glued together guitar cutouts. Glue your two smaller rectangles, one on top of another, around the neck of your previously glued together guitar pieces.
5. Now it's drilling time. (Aka- Time to call hubby because drills totally freak me out.) Drill four holes approximately 1/3 inch below your larger rectangles and about 1/2 inch above your smaller rectangles. Honestly, the measurements aren't that important. You can just eyeball it. Just make sure that (a) your holes are evenly spaced and (b) four rubber bands could potentially be strung from one set of holes to the other. Oh yeah, when drilling the holes on the head of the guitar, try not to place the end holes too close to the edge of the cardboard. Otherwise your rubber band will periodically slide off...
6. Now it's painting time (Aka- Let's get funky and creative!)
7. You may notice that your cardboard starts bending. This isn't good because it will prevent your cardboard pieces from properly sticking together. Don't worry! Just use some heavy books to flatten your cardboard out. (Sadly, my two previously glued together guitar pieces were coming undone. I reattached them by squeezing in more glue between the crevices.) Let glue dry.
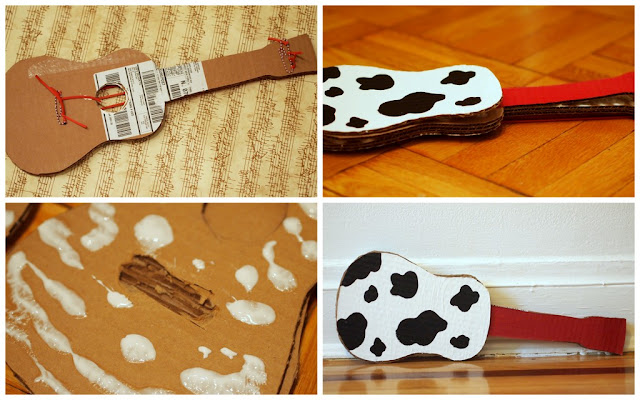
8. Now let's string the guitar! Cut your four jumbo sized rubber bands to make four long strands. Double knot each rubber band to a paperclip. Then, string your four strands through the holes in the neck of the guitar. Pull to make sure that your paperclip sits flush against the cardboard. Pull those strands down one by one through the holes in the body of your guitar. Double knot the strands to another paperclip. (I had some problems tying my middle rubber bands to the paper clip, so I just double knotted them to each other.) Trim all your excess rubber band bits.
9. Make four small indentations in your cardboard rectangle bits (on the front of the guitar) to keep rubber bands in place.
10. What? Aren't we done yet? No way. Crapting is not for the weary. Time to cover up the ugly rubber band ends and paper clips. Spread a thick layer of glue on the back of your newly strung guitar and glue on your third full guitar piece. Make sure the painted neck is shown. Apply pressure to make sure the pieces stick together. Then, glue on your small guitar body on top of that. Again, apply pressure.
11. Note: I found that my pieces wouldn't stay glued together because my jumbo paper clips were pretty thick. If you find yourself with this problem too, you may need to cut out two "wells" in your cardboard so that the paperclips have a nice place to rest. Then your cardboard pieces should sit nicely together.
12. Enjoy and rock out.
Phew. I'm exhausted. Time for bed. Goodnight!
(Why cow print? Well, whenever we ask him "What does a cow say?" he responds "Mmm mmm." Then we always cheer because that's close enough for us.)
Want to make your own guitar? Read on!
DIY Cardboard KidsGuitar
(Disclaimer: I got the template and directions from Make It and Love It. They wrote a really comprehensive set of directions packed full of lovely photos. Check out their post for detailed directions and cute kid pics. I'm posting up this set of directions because I did things slightly differently.)
(Disclaimer 2: This project takes a long time. Crapting helps me to relax, so I didn't mind.)
Materials Needed to Make a DIY Kids Guitar
- Already cut out and assembled guitar template (follow her directions on how to resize, cut, and assemble pieces)- Exacto knife
- Aleene's tacky glue (you'll need something stronger than Elmer's, hot glue didn't quite work for me)
- Scissors
- Nice cardboard (no bends or stains) <-- crap
- Ruler
- Drill
- Paint, paint brushes, Mod Podge
- 4 jumbo 7 inch rubber bands (purchased at Staples)
- 2 paperclips (I used jumbo sized ones, but I think 1 inch ones would work too)
- heavy books
Directions to Make Your Own DIY Cardboard Guitar:
1. Trace and cut out 4 guitar pieces out of your cardboard:- 3 full length guitar cutouts (with holes cut out of the center of them)
- 1 body only guitar cutout (cut your template at the dotted line and just trace out the bottom portion)
2. Glue together two of your full length guitar pieces. Now you have a nice sturdy base. (You don't want your rubber bands to bend the cardboard.)
3. Cut out 4 rectangles out of cardboard:
- 2 larger rectangles- approximately 3 inches x 1/4 inch
- 2 smaller rectangles- approximately 1 3/4 inches x 1/4 inch
4. Glue your two large rectangles, one on top of each other, about 1 inch below the cutout circles on your previously glued together guitar cutouts. Glue your two smaller rectangles, one on top of another, around the neck of your previously glued together guitar pieces.
5. Now it's drilling time. (Aka- Time to call hubby because drills totally freak me out.) Drill four holes approximately 1/3 inch below your larger rectangles and about 1/2 inch above your smaller rectangles. Honestly, the measurements aren't that important. You can just eyeball it. Just make sure that (a) your holes are evenly spaced and (b) four rubber bands could potentially be strung from one set of holes to the other. Oh yeah, when drilling the holes on the head of the guitar, try not to place the end holes too close to the edge of the cardboard. Otherwise your rubber band will periodically slide off...
6. Now it's painting time (Aka- Let's get funky and creative!)
- Completely paint one side of the smaller guitar body (I painted it cow print)
- Completely paint one side of your glued together guitar cutouts. (I painted it red and cow print.)
- Paint the neck of your third guitar cutout (That's the only part that will be showing in your final product
7. You may notice that your cardboard starts bending. This isn't good because it will prevent your cardboard pieces from properly sticking together. Don't worry! Just use some heavy books to flatten your cardboard out. (Sadly, my two previously glued together guitar pieces were coming undone. I reattached them by squeezing in more glue between the crevices.) Let glue dry.
8. Now let's string the guitar! Cut your four jumbo sized rubber bands to make four long strands. Double knot each rubber band to a paperclip. Then, string your four strands through the holes in the neck of the guitar. Pull to make sure that your paperclip sits flush against the cardboard. Pull those strands down one by one through the holes in the body of your guitar. Double knot the strands to another paperclip. (I had some problems tying my middle rubber bands to the paper clip, so I just double knotted them to each other.) Trim all your excess rubber band bits.
9. Make four small indentations in your cardboard rectangle bits (on the front of the guitar) to keep rubber bands in place.
10. What? Aren't we done yet? No way. Crapting is not for the weary. Time to cover up the ugly rubber band ends and paper clips. Spread a thick layer of glue on the back of your newly strung guitar and glue on your third full guitar piece. Make sure the painted neck is shown. Apply pressure to make sure the pieces stick together. Then, glue on your small guitar body on top of that. Again, apply pressure.
11. Note: I found that my pieces wouldn't stay glued together because my jumbo paper clips were pretty thick. If you find yourself with this problem too, you may need to cut out two "wells" in your cardboard so that the paperclips have a nice place to rest. Then your cardboard pieces should sit nicely together.
12. Enjoy and rock out.
And here are our two new cardboard instruments:
(Click here for directions to make a cardboard rattle-drum.)
Phew. I'm exhausted. Time for bed. Goodnight!
Tuesday, January 29, 2013
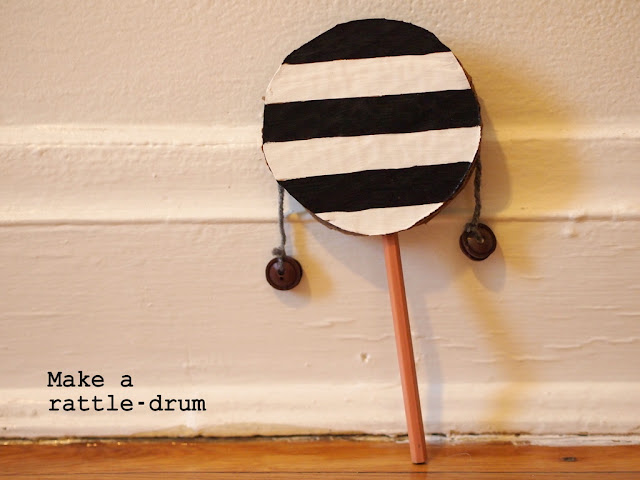
Make a rattle-drum
Chinese New Year is quickly approaching. To help get us in the mood, I made this rattle-drum for Baby Chuck using directions I found in a book of crafts. Do you like the black and white? I chose those two colors to give it a modern look.
Wanna make your own? Here's how I did it.
DIY Musical Instrument: Cardboard Rattle-drum
Wanna make your own? Here's how I did it.
Weird, wonderful snow dough
What does the weather look like in your area? Around here it's been wet and cold. Ick. We had a bit of snow last week and then yesterday it ice-rained. Ick ick ick.
As you can probably guess, Baby Chuck and I have been staying in quite a bit. To battle the stir-craziness, I've been crafting and crapting things for him.
Feeling inspired by the snow, I made snow dough by mixing 2 C of cornstarch and 1/3 C of vegetable oil.* The resulting dough was velvety soft and crumbly. (Hubby described it as having the consistency of wet sand.... except that it's dry.)
Everyone had fun playing with it. I enjoyed making "snow balls" and Baby Chuck liked crushing them with his tiny fists.
Ooh. I see a patch of sunshine. Ok, we gotta enjoy it before it disappears. Hope the weather is nicer where you are!
(*Sorry. I had a brain fart and completely forgot where I found this recipe so I can't properly cite it. Big thanks to one nice blogger.)
Monday, January 28, 2013
We ♥ music class
You know when you're in the middle of doing something you love.... and you just don't want to stop because you love it so much? That's how I feel during our weekly music classes.
Seeing the kids' responses to the music just makes me so happy.
Music time from Pink Stripey Socks on Vimeo.
Special thanks to quick thinking Elizabeth for capturing this special moment on her iPhone.
Sunday, January 27, 2013
Ice skating
Hi everyone!
Did you have a good weekend? We had a nice time last week catching up with an old friend in the city and hanging out with family at the ice-skating rink. Here are some photos from the skating rink. Although Baby Chuck and I didn't skate, we still enjoyed people watching and being with family.
Friday, January 25, 2013
Mess free toddler paint (using Ziploc bags)
Now that Baby Chuck and I've already tried one finger paint recipe, I figured we'd give another a try. We found a nice and easy recipe for finger paints from Easie Peasie and then we learned of a great mess free trick from Housing a forest Here's what we did:
Ingredients:
- 3 T sugar
- 1/2 t salt
- 1/2 C cornstarch
- 2 C water
Materials:
- saucepan
- fork
- measuring cups and spoons
- Ziploc bags
- masking tape
Directions:
1. Combine all the ingredients in a small saucepan. Warm until you get a thick goop.
2. Once thickened, remove saucepan from the heat and let it cool. Then, pour your sticky goo into different containers. Add food coloring into each container and stir until you get your desired color. (Don't taste the goo. It's gross. Just thought I'd put that out there...)
3. Pour your paint into the Ziploc bags. Squeeze out the air from the bags and seal them shut with masking tape. Then, let your child squish to his heart's delight!
Disclaimer: Baby Chuck enjoyed squishing the paint around for a couple of minutes... and then he moved onto something else. But not to worry, Hubby and I then had a go at the bags. It was quite relaxing to squish the colors around.
Have a great weekend!
Ingredients:
- 3 T sugar
- 1/2 t salt
- 1/2 C cornstarch
- 2 C water
Materials:
- saucepan
- fork
- measuring cups and spoons
- Ziploc bags
- masking tape
Directions:
1. Combine all the ingredients in a small saucepan. Warm until you get a thick goop.
2. Once thickened, remove saucepan from the heat and let it cool. Then, pour your sticky goo into different containers. Add food coloring into each container and stir until you get your desired color. (Don't taste the goo. It's gross. Just thought I'd put that out there...)
3. Pour your paint into the Ziploc bags. Squeeze out the air from the bags and seal them shut with masking tape. Then, let your child squish to his heart's delight!
Disclaimer: Baby Chuck enjoyed squishing the paint around for a couple of minutes... and then he moved onto something else. But not to worry, Hubby and I then had a go at the bags. It was quite relaxing to squish the colors around.
Have a great weekend!
Thursday, January 24, 2013
Make a lava lamp
Before you read this post, I have a confession to make. I have a school girl crush on Steve Spangler. He's so dreamy and he makes science fun. How can any person resist? *Sigh* Mind you, this isn't my first school girl crush. Back in grad school I thought my stats professor was super brainy and super dreamy too. *Double sigh*
Ok... moving on... Last week Baby Chuck and I made this lava lamp using directions from Steve Spangler's super awesome website. Doesn't it look cool?
Here's what it looked like when put a flashlight behind the bottle::
Want to make your own lava lamp? (Come on, I know you do!) If so, read on, fellow crapter!
Materials:
- empty bottle and cap (we used a soda bottle) <-- crap!
- vegetable oil
- water
- dark food coloring (we chose blue)
- alka-seltzer tablet (divided into smaller pieces)
- flashlight (optional- for alien effect)
Directions:
1. Fill your bottle 3/4 full with vegetable oil. Then, pour water into the bottle until it's almost full. Make sure to lave enough room at the top of the bottle for the alka-seltzer reaction, otherwise liquid will spill out.
2. Add 10 drops of food coloring. (Watch the water turn a different color as the oil remains the same.)
3. Drop your alka-seltzer pieces one by one into the bottle and watch the water bubble and fizzle.
4. (Optional: Put a flashlight behind the bottle and turn off the lights to see sci-fi alien effect)
5. Once you've dissolve all your alka-seltzer pieces, screw the cap on and tip the bottle back and forth. Watch the water and oil roll around. Feel relaxed.
Ok... moving on... Last week Baby Chuck and I made this lava lamp using directions from Steve Spangler's super awesome website. Doesn't it look cool?
Here's what it looked like when put a flashlight behind the bottle::
Whoa- swirly sci-fi effects |
Want to make your own lava lamp? (Come on, I know you do!) If so, read on, fellow crapter!
Materials:
- empty bottle and cap (we used a soda bottle) <-- crap!
- vegetable oil
- water
- dark food coloring (we chose blue)
- alka-seltzer tablet (divided into smaller pieces)
- flashlight (optional- for alien effect)
Directions:
1. Fill your bottle 3/4 full with vegetable oil. Then, pour water into the bottle until it's almost full. Make sure to lave enough room at the top of the bottle for the alka-seltzer reaction, otherwise liquid will spill out.
2. Add 10 drops of food coloring. (Watch the water turn a different color as the oil remains the same.)
3. Drop your alka-seltzer pieces one by one into the bottle and watch the water bubble and fizzle.
4. (Optional: Put a flashlight behind the bottle and turn off the lights to see sci-fi alien effect)
5. Once you've dissolve all your alka-seltzer pieces, screw the cap on and tip the bottle back and forth. Watch the water and oil roll around. Feel relaxed.
Wednesday, January 23, 2013
Smiles
Oi vey, it's cold outside. Baby Chuck and I are fighting the winter doldrums by visiting the shops and hanging out with friends at the library.
Only two more days till the weekend!
Tuesday, January 22, 2013
Make your own rainbow flowers
Last weekend, I made these rainbow flowers.
Aren't they purty?
Wanna bring some rainbow cheer into your life?
They're easy to make. Plus, you get to see science at work.
Monday, January 21, 2013
Cowboy gear part 2: Cardboard tissue box cowboy hat
Cardboard Tissue Box Cowboy Hat
And here's how you crapt a cowboy hat from cardboard...(Directions modified from a video that I viewed here)
Cowboy gear part 1: Make your own sheriff star
Hi everyone!
Here's how I crapted Baby Chuck's Sheriff star:
Materials:
- cake tin <-- crap!
- cereal box <--- crap!
- scissors
- strong glue (I used Aleene's)
- thin permanent marker
- packing tape
- pen
- safety pin
- felt (optional)
- printout of a sheriff star
Directions:
1. Glue your cake tin to your cereal box.
2. Print out an image of a sheriff star that you like. Cut that star out.
3. Trace the star onto the cake tin. Trace and color over the "sheriff" lettering too. Lift up your paper star and reveal your "sheriff" imprint.
4. Cut out the star from the cake tin. Use your permanent marker and trace over your lettering and any decorative designs that you want to stand out.
5. Use your packing tape to "laminate" your star.
6. Cut out a piece of felt (or cardboard), and tape it to the back of your sheriff star to secure a safety pin to your star. (Make sure to orient your safety pin so that the star sits the right way when pinned.)
Enjoy! Yee-haw!
Here's how I crapted Baby Chuck's Sheriff star:
Materials:
- cake tin <-- crap!
- cereal box <--- crap!
- scissors
- strong glue (I used Aleene's)
- thin permanent marker
- packing tape
- pen
- safety pin
- felt (optional)
- printout of a sheriff star
1. Glue your cake tin to your cereal box.
2. Print out an image of a sheriff star that you like. Cut that star out.
3. Trace the star onto the cake tin. Trace and color over the "sheriff" lettering too. Lift up your paper star and reveal your "sheriff" imprint.
4. Cut out the star from the cake tin. Use your permanent marker and trace over your lettering and any decorative designs that you want to stand out.
5. Use your packing tape to "laminate" your star.
6. Cut out a piece of felt (or cardboard), and tape it to the back of your sheriff star to secure a safety pin to your star. (Make sure to orient your safety pin so that the star sits the right way when pinned.)
Enjoy! Yee-haw!
Sunday, January 20, 2013
Cowboy party
Friday, January 18, 2013
Cocoa! Coffee! Face mask!
Thanks MB for suggesting this recipe! |
Maybe you're wondering why I chose to put not one, but three exclamations in my title. Have I finally jumped over the grammatical deep end and resorted to adding lots! of random!! exclamation marks to increase interest! in my posts?!?
Eep. No.
I used a bunch of exclamation marks! to convey how tingly! and zingy! this mask felt on my face. Once I applied the brown goop, my face felt like it was on fire. (I guess that's the effect of the caffeine?) But don't worry, the burning sensation lessened after the first five minutes. By the time the mask dried I didn't feel a thing. (I also couldn't move a thing.)
The recipe claimed that the mask would "decrease puffiness in the face and the eye area, brighten skin and wake up a dull-ish complexion." Erm. My face looked the same post-mask as it did pre-mask... except that it was a lot redder after being scrubbed with coffee grit.
Interested in trying out a mask that smells like warm, dark, gooey chocolate cake? If so, read on.
To make 2 masks:
Ingredients: (I modified this mask for my oily skin. Check the original recipe for ways to modify the recipe for dry skin.)
- 1 T ground coffee
- 1 T cocoa
- 2 T milk
- 1/2 T lemon juice
Directions:
1. Mix together all the ingredients until you have thick goop.
2. Smear goop onto a clean face.
3. Wait till goop hardens.
4. Use a warm washcloth and slowly wipe everything away.
(Word of caution: The dried coffee grounds will definitely scratch your skin. Does that count as exfoliation? No idea....)
Bottom line, I enjoyed the new experience, but I'm not sure if I'll try this mask again.
(If you want to read about my previous attempts at making other skin care products, click the links below:
jello facial pore strips, chocolate face mask, Green tea matcha face mask)
Have a great weekend!
Thursday, January 17, 2013
Crapty cardboard cereal box giraffe
So this is the adorable cardboard giraffe that I fell in love with.
Meet Chloe. (Isn't she darling?)
And here she is au naturale:
This time I used a tissue box to make her. |
I can't take any credit for this template. My talented momma friend Vanessa made it up and let me share it with you. This little giraffe was super easy to make and fun to decorate too. (Polka dots... oooh la la!)
Best part is that little elephant Ella now has someone to play with...
Beasty besties |
Just download this free giraffe template to make your very own Chloe the giraffe.
Happy making, friends!
Wednesday, January 16, 2013
Fun with food coloring, soap, and milk
We've now had 2 days of cold and wet weather. Baby Chuck and I try to go out in the mornings, but we usually stay at home in the afternoons because parking spots are so difficult to find. (Curse you, parallel parking!)
So... what's a cooped up mama and 16 month old baby to do?
Well, yesterday we tried another food coloring activity. This time we found Steve Spangler's amazing science page. He had a demonstration that involved food coloring, dish detergent, and milk. Look what we were able to do:
Materials:
- milk (we used whole... but I bet you could use other types of milk... but the intensity may differ...)
- bowl / container
- food coloring
- dish soap
- cotton swab
So... what's a cooped up mama and 16 month old baby to do?
Well, yesterday we tried another food coloring activity. This time we found Steve Spangler's amazing science page. He had a demonstration that involved food coloring, dish detergent, and milk. Look what we were able to do:
Ooh. Psychedelic! |
Materials:
- milk (we used whole... but I bet you could use other types of milk... but the intensity may differ...)
- bowl / container
- food coloring
- dish soap
- cotton swab
Tuesday, January 15, 2013
How to make cornstarch toddler paint
Now that Baby Chuck is down to just one nap a day, I'm working on finding new and cheap ways to entertain him. Earlier this week I made toddler paint using a recipe I found at the Stay at home educator.
As the paint dried it took on a thick, crumbly texture, so I don't think this would the recipe to use if you wanted to frame your child's artwork. But, if you're looking for a fun, new, (and cheap!) experience, then I highly recommend this simple three ingredient recipe. The paints were easy to make, Baby Chuck had fun, and clean up was super easy.
To make your own toddler paint, just mix together
Psst- if you have any ideas/suggestions for cheap and simple ways that I can keep Baby Chuck entertained during the day, let me know. The cold and wet weather outside has forced us to stay indoors. Needless to say, we're getting a bit stir crazy.
Here are some photos from our first painting session.
For some reason he really wanted to hold a bottle of cooking wine... *sigh* artists... |
I was worried that he would get paint all over himself, but he did a good job keeping it on the paper. |
Tada! Here's his finished work:
Baby Chuck Norris? Nay... today he was Baby Chuckson Pollock. |
As the paint dried it took on a thick, crumbly texture, so I don't think this would the recipe to use if you wanted to frame your child's artwork. But, if you're looking for a fun, new, (and cheap!) experience, then I highly recommend this simple three ingredient recipe. The paints were easy to make, Baby Chuck had fun, and clean up was super easy.
To make your own toddler paint, just mix together
- 2 T cornstarch
- 4 T water
- a couple of drops of food coloring. (I put in 4 drops and then dipped my finger into the paint. Eeek. Bad idea. It turned blue and the color took a while to scrub off. That's why we ended up using paint brushes instead of just painting with our fingers.)
Psst- if you have any ideas/suggestions for cheap and simple ways that I can keep Baby Chuck entertained during the day, let me know. The cold and wet weather outside has forced us to stay indoors. Needless to say, we're getting a bit stir crazy.
Monday, January 14, 2013
E and E wedding
Subscribe to:
Posts (Atom)