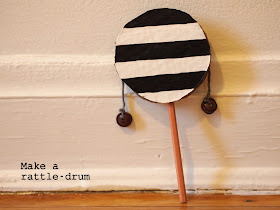
DIY Musical Instrument: Cardboard Rattle-drum
Wanna make your own? Here's how I did it.
Materials:
- Two 4-inch cardboard circles <-- crap!
- Two beads (I didn't have any, so we ended up drilling holes through 4 buttons to create beads*)
- Glue (I used Aleene's original tacky glue)
- Paint and paintbrushes
- Mod podge and sponge brush
- Unsharpened pencil
- Scissors
- Packing tape
- 18 inches of string/ yarn
- Eight 1 inch cardboard squares <-- crap!
* Safety precaution- Yes, I know that buttons are a possible choking hazard. I make sure to watch Baby Chuck while he plays with this little drum to make sure he doesn't get hurt.
Directions:
Step 2: Tape your piece of string down the middle of a circle. Make sure that there are equal lengths of string on each side.
Step 3: Rip one layer of paper off of a cardboard square. Glue that square to the middle of your circle. Make sure to orient the ridges so that they're perpendicular to your string.
Step 4: Glue your pencil onto the ridges.
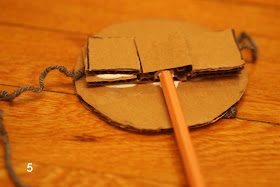
Step 5: Rip off a layer of paper off of another cardboard square. Glue that square down on top of your pencil. Then, glue down two squares on either side of your pencil. (Note: You want to make sure all the squares are the same height. Feel free to glue three squares on either side of your pencil if that makes everything level.)
Step 6: Smear glue on your squares and glue your other circle on top. Make sure the circles line up. Let the glue dry.
Step 7: Triple knot your beads/ buttons to each side of the drum. Make sure that (a) your beads hang evenly on each side and (b) your strings aren't too long. You want to be able to twirl the drum so the beads hit the drum, not get tangled up with each other. (I tried to make each string about half the diameter of the circle.) Trim off your excess yarn. Put a dot of glue on both knots to make sure they don't come undone.
Step 8: Once all the glue is dry, twirl your drum and enjoy. Watch out! You may feel the urge to watch Karate Kid II ... Pin It


