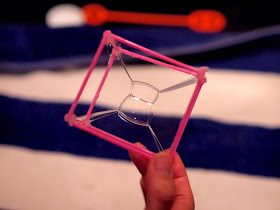
Yes way! Behold! A cubic bubble!
Whoa. It's bubble play for us older folks! Keep reading to see how we made different shaped bubbles:
Materials needed to make square and cube bubbles:
- 12 Q-tips (alternatively, you could do the same thing straws and pipe cleaners I just didn't have straws on hand.)
- Hot glue gun
- Parchment paper
- Bubble solution (we used the store bought kind)
- Wide mouthed shallow dish
Directions to make cube shaped bubbles:
(Today's post was inspired by this Amazing bubble science video from the CrazyRussianHacker. If you're into cool science stuff, he's got some crazy awesome content.)1. Rip all the fuzzy ends off of your Q-tips.
2. Then, hot glue four Q-tips together to make a square. (I did this over a piece of parchment paper to make sure my glue didn't stick to my surface since the Q-tip ends are super tiny.) Then, make yourself a second square from Q-tips.
3. Hot glue your four remaining sticks between both squares to make a cube. (Don't worry if it isn't perfect. Mine is wonky looking, but it still worked.)
4. Now pour your bubble solution into your dish.
5. While holding the corners of your cube, coat all six sides with the bubble solution. Then, wiggle your cube (or gently tap a corner against something) and you should see cool looking bubbles appear. (This took a bit of practice, but I found that I struggled when I didn't have enough bubble solution in the dish. Also, the tapping action really helped the bubbles to form.)
We made a square bubble...
And we made a cubic bubble...
And one time we made two wonky rectangular bubbles...
Hopefully you'll give this activity a try. I think older kids (and young-at-heart adults) would really like this activity.
Have fun, bubble scientists! Pin It


