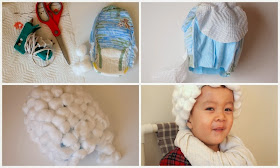
Come on, you wanna see how I made this thing.... so keep reading to find out!
Materials:
- Pull up diaper (We used size 4 and it juuuust fit his head)
- Scissors
- Glue gun (with multiple glue sticks)
- Paper Towel
- Cotton Balls (About 100)
Directions:
(There are lots of directions online showing you how to make wigs from paper bags and cotton balls. We currently don't have any usable paper bags, so I followed these directions for a cotton ball wig.)
1. Place your pull up diaper over your child's head to make sure that it fits. (We used a size 4, but I think Chuck would have been more comfortable in a size 5.)
2. Cut out two identical sized circles from your paper towel to cover the leg holes. Hot glue them over the leg holes and trim off any excess material.
3. Cut out a rectangle from your paper towel and attach it to the waist of your diaper to act as a the little pony tail.
4. Hot glue your cotton balls on! (To make sure I had enough cotton balls to cover the entire diaper, I pulled each cotton ball slightly apart so that it covered double the area.)
Once your hot glue dries, wear your wig proudly!
(Note: In full disclosure- Chuck wore the wig for a couple of moments while I snapped photos. Once I was done, he then promptly took it off and ran around the apartment pretending to be a fireman. Oh well!)
He definitely enjoyed this second George Washington craft more. We colored in this George Washington Coloring Sheet and then glued on a cotton ball wig.
Happy Presidents day! Pin It


