Collaborative Art Project: Finger Painted Starry Night!
(This post contains affiliate links. Thank you so much for your support!)
For months now I kept seeing Kidzaw Master Art Kits
So let's begin!
Materials and Ingredients Needed:
- Paper Towels (For cleanup!)
- Scrap paper (To cover and protect your table)
- Scissors
- Pen
- Cereal Box Cardboard (I also used some thin foam packing material that we had from the move)
- Corrugated cardboard
- Crisco
- Corn Starch
- Spoons
- Mini Muffin Tin
- Bowls
- (I have toothpicks pictured, but ended up chucking them and using my fingers instead)
Let's do this!
1. Pull up a photo of the Starry Night.
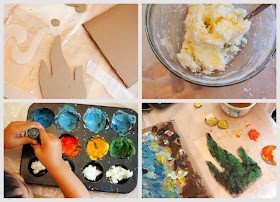
2. Then, cut out different shapes from your cereal box and packing material. I cut out some circles for the stars, a moon, the cypress tree, and some wavy bits for the background. I also cut out a large rectangle from corrugated cardboard to act as our canvas.
3. Invite your child to look at the painting. Ask him to describe what objects, shapes, and colors he sees.
4. Make your finger paint. (This finger paint was inspired by the Crisco face paint recipes that I saw online.) Mix your ingredients in a 1: 2 ratio. So you'll combine 1 spoonful of Crisco to 2 spoonfuls of corn starch. Make sure to stir them together really well. At first it will just seem like a big white clump, but then you'll get something that resembles greasy mashed potatoes.
(Hrmm, that sounds kind of gross. But it's not.)
5. Spoon your mixture into your mini muffin tin. Then add food coloring to make each color. (We had to add quite a few drops to get the super saturated hues.) Mix the colors up with your fingers.
6. Then, get finger painting! I was fine working with the paint as is, but Chuck found it a bit difficult to spread. So I gave him a small bowl of warm water to dip his finger into before dipping it into the paint. This helped to soften up the paint.
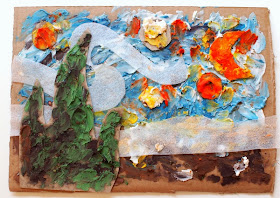
7. Once your pieces are all "painted," assemble your artwork by simply placing the pieces on top of the large piece of corrugated cardboard.
And now you have Van Gogh's magical starry night... in finger painted Crisco form.
(Hrmm.. that sounds weird to say. Ooh. Nevermnd. Look at that texture!)
Final Reflections
This was definitely a collaborative project. Chuck finger painted the moon, bits of the stars, a bit of the tree, and a bit of the sky. But then he got tired and began pouring water into the muffin tins. (Everything seems to turn into water play with him!) But I didn't mind because I was having too much fun painting too. I think this would have definitely been a fun project to try out with a bunch of kids. That way every child could do a little part and then you could put all their artwork together to make something magical.Other creative ways to paint with children
Here are some other fun ways you can paint with kids:
- 2 Ingredient Homemade Paint
- Make Edible Tortilla Art
- Marbling with Nail Polish
- DIY Corn Syrup Paint
- Make Corn Husk Paint Brushes
- Easy Melted Crayon Art
And you can always find other great ideas on my Pinterest, Facebook, Instagram, or Twitter accounts!
Until next time, happy painting! Pin It


