Toilet Roll Biplane Craft
Note: This post contains affiliate links. Thank you so much for your support!
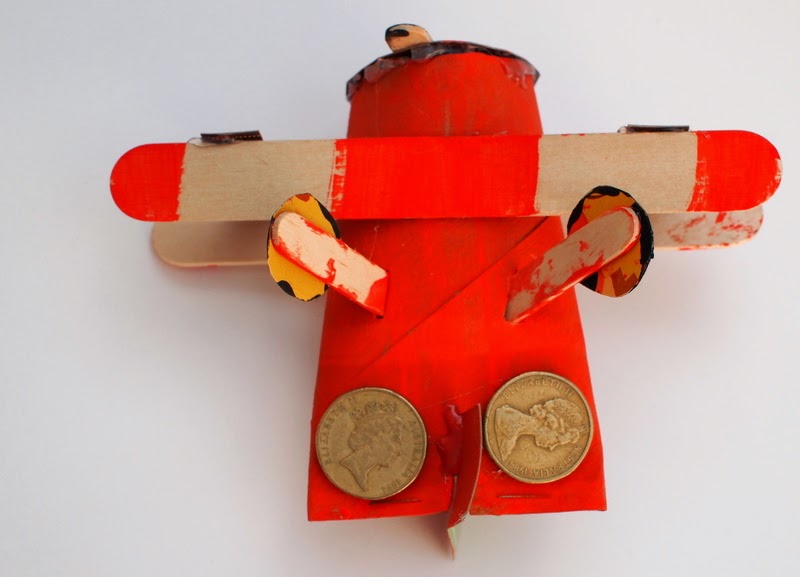
I think he looks a little like Leadbottom from the movie Planes, don't you?
Check out how we made this simple plane from recycled materials below!
Materials Needed to Make Toilet Roll Biplane Airplane
- Toilet Paper Roll
- Stapler
- 2 Coins
- Tape (We used this kind.)
- Scissors
- Sharpie Markers
- Paint
- Fastener
- Popsicle Sticks (We used this kind
and this kind
)
- Cereal Box
- Paint Brushes
- Hot Glue
- Drill
- Craft Knife
Let's Make a biplane!
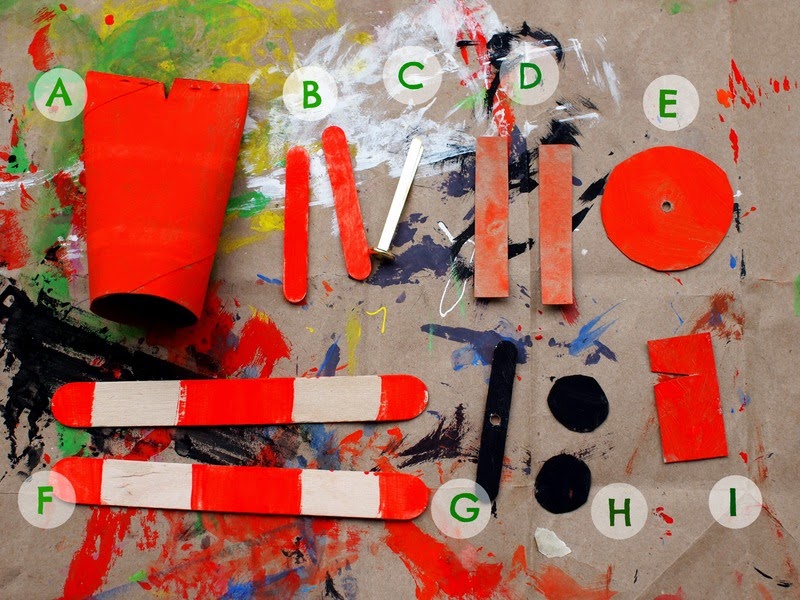
Here are all the parts that we created or found, and then painted.A. Toilet Paper roll body: Seal one end shut with two staples and then cut out a slit in the middle for the tail piece to fit through. Note: Before doing this, I SHOULD HAVE also taped and hot glued in two coins inside the toilet roll body to properly weigh the plane down. The front part of the plane is heavier than the back, so the plane won't stand upright correctly without the weights. I didn't do this prior to painting and ended up attaching the coins to the plane's bottom. This looked a tad bit unsightly. (You can see the photos below.)
B. Mini Popsicle Stick legs: You need two of them for your plane.
C. Fastener: You need one to attach the propeller onto the front of the plane
D. Wing Supports: Cut out two identical rectangles from a cereal box to support your set of wings.
E. Front of Airplane: Trace your toilet roll onto a cereal box and cut the circle out. Then, drill a hole through the center for the propeller.
F. Jumbo Popsicle Stick Wings: You need 2 of these.
G.
H. Wheels: Cut out two identical circles from your cereal box.
I. Tail: Cut out a rectangle for a tail. Then, cut out a slit to attach it to your plane.
Once your paint dries, use Sharpie Markers to further decorate them. Then, assemble your parts!
First attach your propeller to the front of the plane.
(The rest is pretty self-explanatory. Use hot glue to glue your pieces on!)
And just so you can see, this is how I ended up weighing down my plane. I taped and glued on two coins the back, bottom portion of the plane. But you should do that inside the toilet paper tube so that no one will see the coins.
To attach the legs, cut two slits with your craft knife into the bottom of the plane. Then, just slide the legs in. (You can glue them in place to make everything more secure.)
You're all done! Now it's time to take your plane out for a spin!
Looking for other fun cardboard kids crafts?
If you liked this cardboard craft, you might also like my cardboard rocket launcher toy, cardboard cash register, cardboard cactus construction set, or toilet roll pumpkins!Let's keep in Contact!
Like this idea? You can always find other fun ideas on my Pinterest, Facebook, Instagram, or Twitter accounts!Happy making, friends!


