How to Fold Easy Origami Face Changers
This post contains affiliate links. This means I make a small bit of money for any purchases made through the links at no additional cost to you. Thank you for your support. For my full disclosure policy, click here.
Who came up with this Origami craft?
Not me! I gotta give credit to my eldest son. :) He loves origami and came up with this fun idea after folding an origami windmill.Also, if you want to see the origami face changer in action, watch this short video!
Materials Needed:
- Origami paper (This is my current favorite brand. We love Daiso!!)
- Sharpie Markers (I like these because they tend not to smear on the origami paper.)
Let's Fold some Origami Face Changers!
First, we're going to do a lot of folds that seem inconsequential, but serve the important purpose of creating fold lines for future folds.
2. Open it up and fold it in half vertically.
3. Open up your fold and your paper will look like this:
4. Fold both sides vertically to the middle.
5. Unfold the folds made in step 4.
6. Fold your paper horizontally so that the ends meet the middle.
7. Fold it in half so the left and right ends meet in the middle.
8. Unfold the folds you made in step 7.
9. Fold your upper left and upper right corner to the bottom middle. You'll see a triangle like this:
10. Unfold the folds you made in step 9.
11. Then, fold the bottom left and bottom right corners so they meet in the top middle, creating this triangle:
12. Unfold the folds you just made in step 11 and you'll get this.
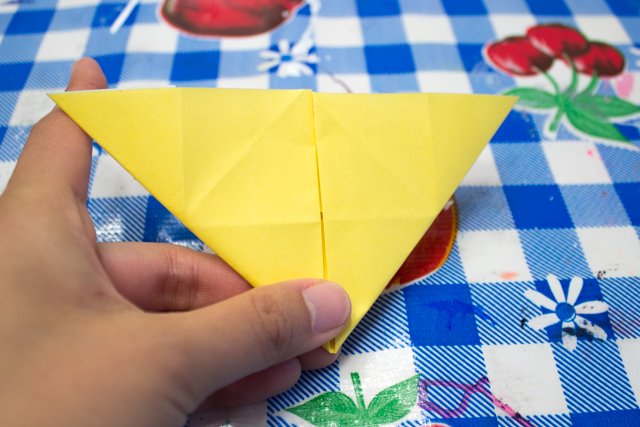
Ok! Now we're going to do a "squash fold." (This is tricky to explain, but not tricky to do.) Here goes!
13. Let's squash fold the right side. Open up your ride side like so... (see where my finger is?)
14. Use that finger to push that open edge to the middle. (It should fold alone one of your previously folded diagnoal creases.)
15. Do the same thing for the bottom portion. Push the edge to the middle as well...
16. Now it's time to "squash" the side over...
Squashed! Yeah!
Now do the same "squash fold" to the other side.
Squashed!
Let's Draw Our Emoji Faces
Grab those Sharpies. It's time to draw the 2 faces you'll flip between.
Note: To make sure the faces align, draw your face shape all the way to the edges. Also, put your eyes in a specific spot (I put mine on the diagonal fold lines.) And, if you're going to show a tongue sticking out, make sure to draw it on one side.
Fold down those top two flaps and fold up the bottom two flaps.
Draw your second face!
(Remember to spread your face to the edges.)
Then, flip your flaps around to make different funny faces.
Looking for More Unique Origami Crafts?
We have a ton of quirky and fun origami crafts on the blog. Here are my 10 projects:- 3 Step Easy Origami Faces
- Origami Monster Claws
- Origami Sumo Wrestlers
- Origami Snails
- Giant Origami Butterflies
- Origami Unicorns
- Origami Pikachu
- Origami Mermaids
- Origami Trolls
- Origami Totoro
Happy folding, friends!


