How To Make Corn Husk Flowers
(A Super easy and beautiful craft for kids and adults!)
This post contains affiliate links. This means I make a small bit of money for any purchases made through the links at no additional cost to you. Thank you for your support. For my full disclosure policy, click here.
Materials Needed:
- Corn husks (which I found at the grocery store- mine had about 40 husks per bag)
- Food coloring or liquid watercolors
- Pyrex dishes, baking dishes, or pots
- Hot water (and a water kettle, preferably)
- Scissors
- Old towels
- String, floral tape, stretchy tape, or masking tape
- Hot glue and hot glue gun
Let's Dye Our Corn Husks!
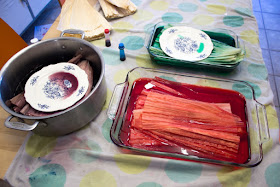
1. First, you'll have to dye the corn husks. Heat up some water (I used a hot water kettle to do it quite quickly) and then pour the water into a pyrex dish, baking dish, or pot. Add a TON of food coloring or liquid watercolors. (I used half a container of food coloring for each container shown below) Then, put your corn husks inside. (Use a plate to help keep them submerged.)2. Leave your corn husks in the liquid. (I left mine in for 30 minutes and got a pretty nice color. For deeper colors, leave your corn husks in longer. Or, you can also use clothing dye to dye corn husks for more vibrant colors. But you'll have to use gloves to dye the corn husks that way!)
After dying one match, I emptied out the colorful water and heated more water to dye other husks different colors. But I'll bet you could also just reheat that leftover dye color and dye more if you don't want to waste your dyed water.
3. Once you're satisfied with the color and the amout of dyed corn husks, leave the corn husks out to dry.
I dried them overnight and the corn husks became quite stiff. They were certainly too stiff to bend into flowers, so I had to quickly dip them in hot water and then set them out to dry. In about 4 hours the husks were dry enough and still flexible enough to use.
Let's Make Corn Husk Flowers!
This is one of my favorite flowers:(By the way, this flower was dyed by the lady who taught me this craft, so I'm not sure how she made such beautiful multi-colored husks. Perhaps she used blue and purple to dye them? Not sure...)
1. To make the inner part of this flower, take a corn husk and fold it in half. Then cut thin slits in it, like so: (Like you're cutting a Chinese lantern craft)
2. Then, roll it up to create the center. (Make as many of these as you want for the center of your flower. Just squish them together.)
3. To make the larger outer petals, rip your corn husks into thinner pieces and then fold them in half, like so:
4. Add them to the outer portion of your flower:
5. Keep adding until you get a lovely flower!
You can use green pieces to create leaves.
6. When you're done, use string, floral tape, stretchy tie tape or even masking tape to tie your husks together. Tie it tightly!
7. Then, trim the bottom of your flower and use a hot glue gun to glue on a piece of corn husk around the flower stem to hide your tape. Tie on a thin strip of corn husk if you want to add a decorative "ribbon"!
If you want to make this sort of corn husk flower...
It's basically the same steps...But instead of folding corn husks to create larger petals, simply cut out petal shapes
You can keep them the same shape, like we did here, or you can change their shapes and sizes to create a more realistic flower!
Tie the bottom in the same way as you did before!
And if you want to make this flower
Rip up thinner strips of corn husks and then twist them in the middle before folding them in half. Everything else is the same.I really, really hope you have fun trying out this craft at home with your kiddos! If you're on IG, I'd love to see your results, so tag me on @PinkStripeySocks so I can ooh and ahh and celebrate your creativity with you!
More Corn Husk Crafts
Oh! And if you're looking for crafts that you can make with fresh corn husks (like the ones you get right off the cob) check out the links below!
Happy making, friends!
Pin It


