Showing posts with label clothes. Show all posts

Friday, July 10, 2020

Easy DIY Tie-Dye T-shirt Macrame Plant Holders... with kids!

It's summer! Which means it's time for succulent crafts and tie dye crafts! Today's activity is perfect for this time of year. Everybody is tie-dyeing. Everybody is reminiscing about nostalgic summer camp crafts. And everybody is going bonkers planting. (And who doesn't love succulents?) So grab an old tie-dyed t-shirt, a cute potted plant, and let's make this adorable DIY macrame plant holder for yourself... or give it to a friend!

How to make Easy Tie-dyed T-shirt Macrame Plant holders

(A fun summer craft for kids, tweens, teens, and adults too!)


how to make easy DIY Macrame Plant Holders from old tie dye T-shirt fabric yarn, the perfect summer craft for the whole family (kids too!)


Note:  This post contains affiliate links.  This means I make a small bit of change when you purchase items through the links.  Thank you for your support and the grocery money! For my full disclosure policy, click here.


Saturday, December 19, 2015

Make a T-Shirt Ninja Mask! (And our 10 top Ninja Books)

Does your child totally dig ninjas?   Then this post is perfect for you!  We love making easy, homemade costumes and today's is my favorite idea so far.  Here's a super quick way to make a t-shirt ninja mask!  All you need is a t-shirt and a minute.  That's it!  No sewing or gluing required!

Super Quick and Easy T-Shirt Ninja Mask!

How to make a t-shirt ninja mask- free, no-sew, and ready to wear in under 1 minute!
This post contains affiliate links. Thank you for your support!


Wednesday, March 25, 2015

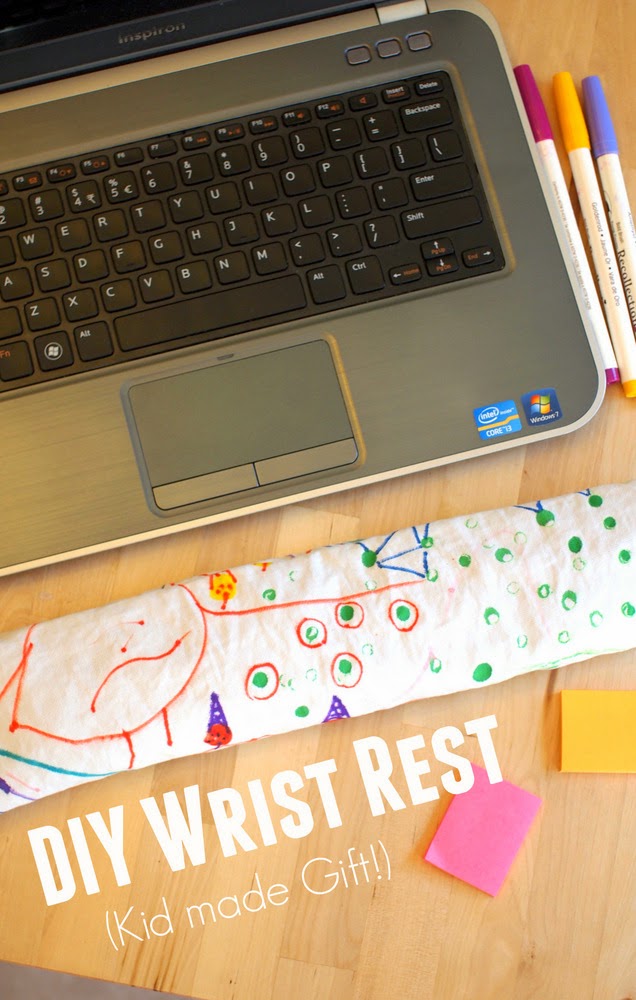
How to make a DIY Computer Wrist Rest (Kid made gift idea!)

Do you use a computer a lot? Do your wrists feel sore?  Lately hubby's been working long hours on his laptop.  Chuck and I were worried because he started noticing that his wrists hurt.  Yikes.  So we whipped up this computer wrist rest for him for FREE!  Yup!  We didn't need to buy anything super fancy because we already owned all the materials.

DIY Computer Wrist Rest 

how to make a computer wrist rest decorated with your child's artwork for for practically free!

This post contains affiliate links.  Thank you for your support!

Wouldn't this make such a cute and useful DIY gift for kids to make?


Saturday, January 17, 2015

What's up? Happy Handmade- A Joint Craft eBook Adventure!

Hi everyone!  I don't usually post on Saturday but I'm posting today because I'm feeling super excited and super nervous about next week.  (Isn't it funny how those two feelings often seem to go together?)  

Around this time last year, I shared my now-not-so-secret dream of being a professional crafter.  Re-reading that post, I wish I could go back in time to hug my old-self, and tell her that I'm proud of her for taking a step in a new direction.

Throughout 2014, I took several steps towards making that dream a reality.  I pushed my super shy self to join a couple of really supportive kid blogger groups (like Kid Blogger NetworkRockin Art Moms , and the Creative Preschool Collaborators.) I dipped my toes into the super scary (and still, completely confusing) world of blog advertising and sponsorship.  And, I also got the opportunity to do some freelance craft work for wonderful sites like Handmade CharlotteMollyMoo Crafts, and DIY Candy.

You're probably wondering now- Leslie, was it worth it?  Are you raking in the big bucks?  Well, yes.  I'm glad that I took those initial steps.  And no, I'm definitely not making big bucks.  But, I do make some grocery money and I really appreciate the opportunities that come my way.

And that's what I wanted to share with you today- one of these opportunities.  (Sorry for the rambly intro, but I felt so nostalgic after re-reading my posts from 2014 that I had to say something first...)

I recently had the opportunity to join with 17 other kid-craft-loving moms to put together Happy Handmade- a beautiful, unique and fun ebook showcasing 115 pages of crafts to make with and for kids!  

Happy Handmade Kids Craft ebook!
   

I'll be sharing more about the ebook and how you can purchase it on the blog this Tuesday, January 20th.  But I just wanted to just write something about it today because there are just so many lovely and unique ideas inside.  And my heart feels like it's bursting open because I'm so proud of all the work that went into it.    


Ok.  That's all friends.  Thank you for stopping by and thank you for all of your support.


And before you go, here's a sneak peak at some of the crafts inside...
*Insert happy sigh here*

happy handmade joint craft ebook inside sneak peak


  Hope you have a wonderful rest of the weekend, friends!
   

Thursday, January 8, 2015

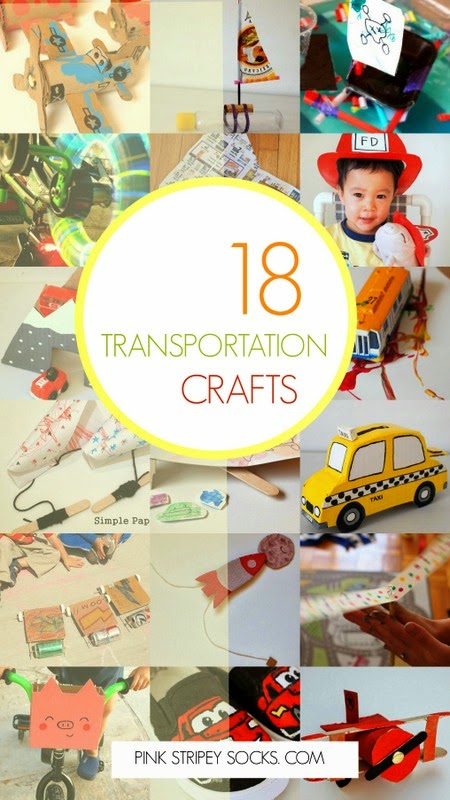
18 Transportation Crafts that "Go!"

Do you have a plane, train, helicopter, truck, boat, car, or spaceship loving kid?  While looking through the archives, I realized that we've done quite a few transportation-related crafts here.  18 to be specific!  (Whoa.  Kinda cray-cray and kinda cool...)  So I thought it would be fun to take a walk down memory lane and share this compilation of all 18 crafts that "go" here!

18 Awesome Transportation Related Crafts!


18 AWESOME Transportation crafts- planes, trains, buses, bikes, space shuttles, kites, trucks


Ok.  I gotta admit something to you.  I was originally going to call this post, "Crafts for Boys" (that's why it's in the permalink) but then totally decided against that name.  Girls can like cars, trains, planes, boats, trucks, and bikes too! Right?  Right.  Ack!  Sometimes it's so easy to fall into gender stereotyping.  (Do you ever feel the same way?)   So anyway, that's why I changed the name to Transportation crafts.

Friday, October 24, 2014

Glow in the Dark Moon Shirt

My son loves pointing out the moon at night.  Today I'm over at DIY Candy sharing how I made him this adorable glow in the dark moon shirt.


DIY Glow in the Dark Moon Shirt

DIY glow in the dark moon shirt


(By the way, did you see the solar eclipse yesterday?  We totally missed it. Ack!)

And if you really like glow in the dark crafts, here are some more from the archives!


Other glow in the dark crafts:

Have a great weekend, friends!

(Remember, you can always find other fun ideas on my Pinterest, Facebook, Instagram, or Twitter accounts!)

Tuesday, June 24, 2014

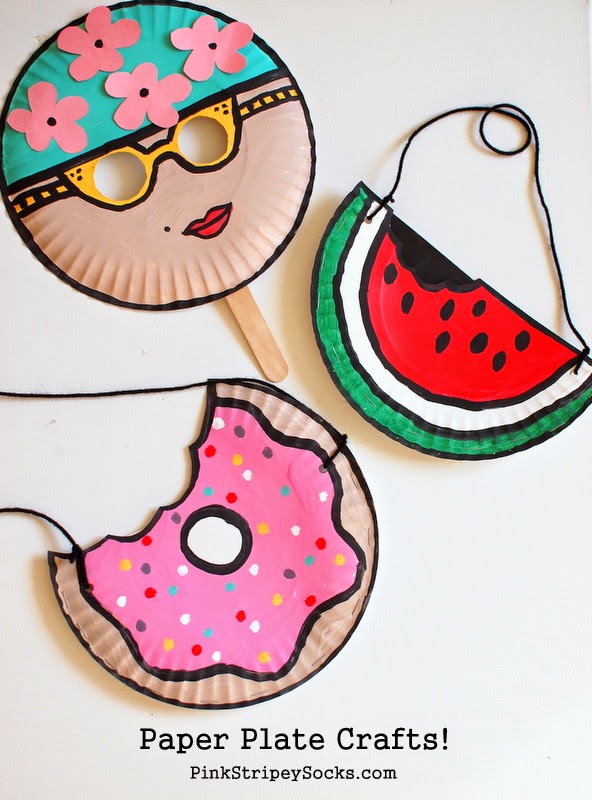
Summer Paper Plate Crafts

It just hit me this morning that July 4th is next week.  Next week. Summer is just flying by!  Ahhhh!  So I feel the need to do some summer crafts and that's why I made these super easy paper plate crafts.  I dunno about you, but when I imagine summer, I see outdoor picnics, grill outs, and beach adventures.  These activities usually involve disposable paper plates... which are such a great item to craft with because they're super cheap and super versatile.

Fun Summer Paper Plate Crafts for Kids

Easy Summer Paper Plate Kids' Crafts (Mask, Watermelon + Doughnut Purse)

(This post contains affiliate links.  Thank you so much for your support!)

So these are my summer inspired paper plate crafts.  They're super easy to make, colorful, quirky, and just scream SUMMER FUN!


Thursday, June 12, 2014

No Sew Super Hero Cape

I don't sew.  I tried, but it just never happened.  (And since we're disclosing dirty, crafty secrets, I'll also admit that I don't crochet and I'm a terrible knitter.)  Last week we saw a boy wearing a cape in the park.  Chuck loved it so much that he asked me to make him a cape too.  That's when I thought, "Uh oh.  I'm a terrible sewer... that might be a problem."  But then I thought about it and came up with this ridiculously easy, super quick, crazy cheap, no sew super hero cape. 

No Sew Super Hero Cape 

(Perfect for your little super hero and his or her best super hero friend)

easy, no sew super hero cape!
(This post contains affiliate links.  Thank you for your support!)
 
This cape took only a couple of minutes to make... which was awesome because Chuck and piggy were too excited and trying their very best to wait patiently.   I almost didn't post this tutorial because it was ridiculously easy.  But the photos of Chuck wearing the cape were too cute to not share.  Let's get making!

Monday, April 14, 2014

Sharpie Tie Dye Shirt

It's Monday and we've finally started returning to our normal sleep schedules.  (Yes!)  And now that we're back and settled in, I realized that Easter is right around the corner.  Yikes.  Is it April already?  It totally snuck up on me this year. So here's my first semi-Easter related tutorial:   Sharpie Tie Dye Shirt


Toddler made- Sharpie Tie Dye Shirt

Wait, what does this shirt have to do with Easter?  Well, kids seem to wear cute, colorful outfits on Easter.  (See last year's DIY I heart Peeps Shirt.)   A friend graciously donated a bunch of clothes to us and one of the items was a blank white shirt.  It screamed "Paint me, paint me."  And so Chuck and I used it to make this year's Easter shirt together.  Keep reading to see how we made it!


Monday, March 17, 2014

Ed Roth Stencil1 Stenciled Shirts

Note:  This post is sponsored by Plaid, but the opinions are 100% mine.
 
One of my favorite things to do is turn Chuck's plain shirts, pants, and shoes into unique and fun pieces.  For example, I painted him a pair of Lightening McQueen shoes and stenciled him an  "I heart peeps" Easter shirt. So you could see why I was super excited when Plaid sent me some Ed Roth Stencil1 stencils and FolkArt Multi-Surface Paints to try out.  I loved the stencils' bold and graphic look so much that I used them to update one of Chuck's plain shirts.

Ed Roth Stencil1 Stenciled Shirt 


Keep reading to see how I stenciled Chuck's shirt!

Sunday, February 9, 2014

Felt Heart Button Covers

Valentine's day is coming up this Friday.  Are you still looking for something kind of "Valentines-y" to wear?  Well, why not add temporary heart embellishments to the clothing you already own?  Try making these DIY felt heart button covers.  They're easy to make and add some festive Valentine's spirit.

Keep on reading!

Friday, February 7, 2014

DIY Metal Cap Toe Boots

Have you heard of Boo hoo?  They're an online clothing retailer that's popular in Europe and recently started branching out in the US.  A couple of months ago they sent me a pair of Mya Buckle Trim Biker Boots to use in a DIY craft.  At first I wanted to add a ton of studs to them... but the studs got lost in the mail. So I took an alternate route and gave them some spray painted metal cap toes! 


Keep reading to see what I did!

Wednesday, February 5, 2014

DIY Splatter Painted Pants

Everything outside is grey, grey, grey.  Bah.  I've been longing for some color in my life.  So that's why I took a pair of pants and went crazy.  Yurrrp.  I splatter painted the whole thing bright happy colors.

DIY splatter painted pants

They look pretty crazy... and pretty cool.  (They were also inspired by by this awesome splatter pant tutorial from PS-I Made This.) So far I've worn these pants around the apartment but I have yet to wear them outside.  (What's the correction occasion for such colorful pants?  Hrmm...)Now if you'd like some color in your life too, keep reading!


Sunday, February 2, 2014

DIY Inkblot Shirt

We received a bunch of hand-me-downs awhile back and one of the items was a plain black shirt.  I saw it and immediately knew that I wanted to try painting something on it.  But I wasn't sure what...   Now that I've been sick for the past couple of weeks, Chuck and I have pretty much stayed at home.... the whole time.

Now,  I love Chuck, but being locked indoors for long periods of time totally drives both of us CRAZY....   So that's what inspired me to make this DIY Inkblot shirt.

What do you see when you look at the design?
DIY Inkblot shirt for kids
Keep on reading to find out how I made this bad boy!

Tuesday, January 21, 2014

DIY: 5 Ways to update your old beanie

Hubby's away and Chuck and I are currently stuck at home, sick.  Boo.  We're watching the lovely fluffy flakes falling outside and I'm soooo tempted to bundle him up to play outside.  But, I'm holding myself back until he gets better. 

(Hrmm... but maybe I could bring some snow inside for us to play with.... thanks Lisa for that idea!)

Anyway, here's a short cold weather post in honor of the snow.

Do you have an old beanie just lying around? Maybe you never really wear it, but you just can't bring yourself to give it away just in case you need it one day?  Well, here are five super easy ways to update your drab head wear.   And bonus!  None of these are permanent changes, so you could potentially wear all five looks this winter! 

  1. Pom Pom Beanie

This update was my favorite.  Chuck is beginning to recognize Micky Mouse.  So when I saw Eugenia Kim's Pom pom beanie (for $185- holy empty wallet!), I knew that I had to make my own cheapie version.  I followed this pom pom tutorial  from Crafted.  Then, I sewed the two semi-identical (eek!) pom poms onto the corners of my beanie.  Bam.  Instant mousekateer cool.

And here I am modelling the four other updates....
2.  "Hi" Beanie:  I cut out the letters "H" and "i" from felt.  Then, I just sewed them onto the front of the beanie for some friendly headwear.  Make sure you sew the letters closer together because they will stretch apart when you wear the hat.

3.  Polka dot Pom Pom Beanie:  I bought a pack of mini pom poms from the craft store and then sewed them onto the hat.  To help with placement, I marked the hat with chalk first so I would know where to sew.

4.  Spiked Beanie:  I poked a couple of screwback cone spikes through the front of the beanie.  I thought the hat made me look like a punky Statue of Liberty. 

5.  Sparkly heart Beanie:  I cut out a heart shape from felt.  Then, I hot glued some rhinestones onto the heart.  Then, I sewed the heart back onto the hat.   Wouldn't this version be nice for Valentine's Day?  

 Alright that's it.  Time to take a nap. Stay warm and well, friends!

Sunday, January 19, 2014

Make a Valentine's Day "Arrow through the Head" Headband

Oh no!  Chuck's been shot...
(With Cupid's arrow.. teee hee hee)

Valentine's Day "Arrow through the Head" Headband


DIY "Arrow through the head" Headband

Looking for a cute Valentine's Day accessory that is affordable, easy-to-make, kid friendly, and boy friendly?  Well, you could always try making this "Arrow through the head" headband...

Thursday, January 9, 2014

Risking Rejection.... while wearing sparkly tights


Eeek!  My legs... for all the world to see....

Today's post is a departure from my normal craft/diy posts.  Now, if you just want to see how I made these sparkly tights, scroll directly to the bottom of the post.  But if you want to read about a neat, new Thursday blogging series and a bunch of courageous gals, read on!


Tuesday, December 17, 2013

DIY Earmuffs? (A craft flop)

A couple of weeks ago I couldn't sleep.

Did I drink too much coffee?  Nope.  Was I worried about Christmas shopping? Nope.

Don't laugh, ok?  *Big breath* I couldn't sleep because I kept thinking about how I could crapt myself a pair of earmuffs using stuff in our apartment. 

Weird right?  I don't even wear earmuffs... but for some reason I kept wondering if I could make them.  So the next day I played around with some materials ... and I ended up with a pair of these:


I have kind of mixed feelings about them.  On the plus side, they look like earmuffs and they also block out some of the cold.  However, they feel a little too light and stiff around my ears. 

So, while I'm proud that I made a pair of semi-working earmuffs, I think this is probably a craft flop.  Now if for some reason you want to see how I crapted these earmuffs (or you wanna see Chuck wearing the earmuffs), keep on reading!


Sunday, November 17, 2013

DIY Pineapple Stenciled Sweatshirt

Last week I admitted that my outfits lately have been less-than fashionable... and I made a manifesto to fight against my tendency to wear sweatshirts and sneakers.

Eh.  Wee-eeeeellll, I backtracked.  Sweatshirts are just so comfortable and warm.  I couldn't resist!  But hear me out, at least I tried making my sweats a little more fashionable by adding some stencils.

Yes.  Pineapple stencils.  Yum!

 Here's what I did:

Materials:
  • Sweatshirt
  • Cereal Box
  • Pencil
  • Exacto Knife
  • Scissors
  • Sponge brush
  • Craft paint
  • Fabric medium
  • Masking tape 
  • Kitchen towel
  • Iron

Directions:

1.  Create a stencil out of a cereal box.
2.  Make fabric paint by mixing your craft paint and fabric medium together.
3.  Place a cereal box inside of your sweatshirt to make sure that the paint doesn't bleed through.  Stencil your sweatshirt by tapping your sponge brush up and down over the stencil.  To ensure that your stencil looks nice and neat, hold the stencil very still, try not to put too much paint on your sponge brush, and practice a couple of times before you work on your actual sweatshirt to get a feel for things.
4.  If you'd like to ensure that your stencil design is uniform, create a masking tape grid to help with stencil placement.
5.  To protect your stencils in the wash, heat set them by placing a thin kitchen towel over them and then ironing it.  

So, what do you think?  I really like how it turned out because now the sweatshirt is comfy and cute too.
Happy crafting!


Wednesday, November 13, 2013

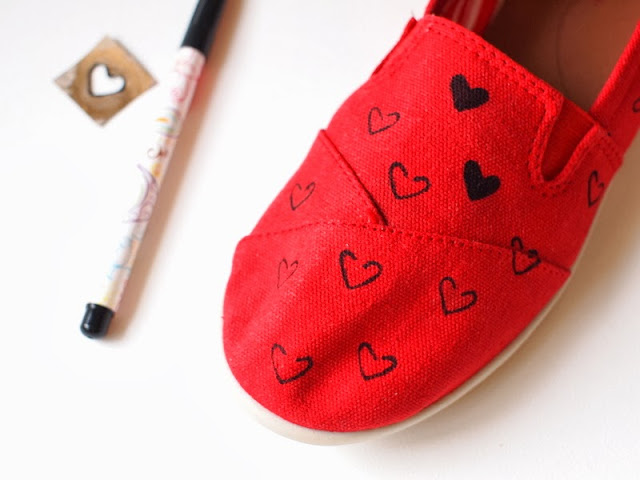
DIY Heart Stenciled Shoes


DIY Heart Stenciled Shoes


DIY Heart Stenciled shoes


As a stay-at-home mom, I often find myself suffering from a terrible illness...  shleppy-clothes-itis.

*sob*  

Yes.  It's true.

Instead of putting effort into my appearance, I often leave our apartment in super comfortable (aka super unflattering) clothes.  Extra large hoodies?  Check.  Shirts with stains?  Double check.  Ratty sneakers?  You betcha.

But I refuse to go quietly into the land of baggy sweats and Snuggies!  Oh no!  I will fight.  And with last weekend's unseasonably warm weather, I took a step in the right direction and crafted this pair of heart stenciled shoes.


These were definitely the cutest things that I wore last week.   I love hearts, so these red shoes were just the perfect little pick-me ups.


Here's how I made them:

Materials to make DIY Heart Stenciled Shoes:

(*Note:  This post includes affiliate links which means that I earn a small commission for every purchase made at no extra cost to you. Thank you so much for your support.)     

  • Canvas shoes (I purchased mine from Walmart.)
  • Fabric markers
  • Cereal box
  • Pencil/Pen
  • Scissors
  • Exacto knife
  • Cutting mat
  • Rags


Directions to make DIY Heart Stenciled Shoes:


stuff rags into your canvas shoes

1.  Stuff your rags inside your shoes.  This will create a sturdier surface for you to stencil.


create a heart stencil from a cereal box

2.  Create a stencil from your cereal box.  (Looking back, I wish I made the area around the heart bigger so that I would have more material to hold onto as I stenciled.)


randomly stencil on your hearts

3.  Place your stencil onto your shoe and trace it.  Keep tracing your shape until your shoe is covered with them.  Then, color your shapes in.  (I tried to make the pattern uniform... but then failed, so I went with a more haphazard look.)

Repeat the procedure with the other shoe.  Wait for your fabric marker to dry, remove your rags, and then enjoy your new custom kicks.

Happy stenciling!

how to stencil hearts onto your shoes