Sunday, November 17, 2013

DIY Pineapple Stenciled Sweatshirt

Last week I admitted that my outfits lately have been less-than fashionable... and I made a manifesto to fight against my tendency to wear sweatshirts and sneakers.

Eh.  Wee-eeeeellll, I backtracked.  Sweatshirts are just so comfortable and warm.  I couldn't resist!  But hear me out, at least I tried making my sweats a little more fashionable by adding some stencils.

Yes.  Pineapple stencils.  Yum!

 Here's what I did:

Materials:
  • Sweatshirt
  • Cereal Box
  • Pencil
  • Exacto Knife
  • Scissors
  • Sponge brush
  • Craft paint
  • Fabric medium
  • Masking tape 
  • Kitchen towel
  • Iron

Directions:

1.  Create a stencil out of a cereal box.
2.  Make fabric paint by mixing your craft paint and fabric medium together.
3.  Place a cereal box inside of your sweatshirt to make sure that the paint doesn't bleed through.  Stencil your sweatshirt by tapping your sponge brush up and down over the stencil.  To ensure that your stencil looks nice and neat, hold the stencil very still, try not to put too much paint on your sponge brush, and practice a couple of times before you work on your actual sweatshirt to get a feel for things.
4.  If you'd like to ensure that your stencil design is uniform, create a masking tape grid to help with stencil placement.
5.  To protect your stencils in the wash, heat set them by placing a thin kitchen towel over them and then ironing it.  

So, what do you think?  I really like how it turned out because now the sweatshirt is comfy and cute too.
Happy crafting!


Wednesday, November 13, 2013

DIY Faux Stained Glass (using Mod Podge and Fabric paint)

Around this time last year, I made myself a lovely faux stained glass panel out of an old frame, Elmers glue, and craft paint.  Sadly, that panel broke a couple of months ago.  I thought it was high time that I made another one, but this time I experimented with 3D fabric paint, Mod Podge, and acrylic paint.   After everything dried, I was surprised by how nice the panel turned out!  Here are the results of my little experiment: 

Tee hee hee.  Do you see bald men sitting in chairs.... or ladies with large hairdos?  They're supposed to be ladies... and I find them hilarious!  (I can't take credit for the design though.  It came right from this pinned image.)  Right now this modern and quirky stained glass panel sits inside Chuck's room and I always supress a giggle whenever I see their round glasses looking at me.

Wanna try making your own faux stained glass panel?  Read on!

Materials:
  • Picture frame
  • Three dimensional black fabric paint
  • Mod Podge (I used Matte)
  • Craft Paint 
  • Paint brush
  • Muffin Tin (or artist's palette)
  • Pen
  • Paper
  • Optional:  Clear tape, glass cleaner

Directions: 


1.  Pull out the sheet inside of your frame and trace it onto a piece of paper.  (Alternatively, you could also trace the glass or back panel of the frame.)  Cut out your rectangle and draw a design on it.

2.  Clean the glass of your picture frame.


3.  Place the glass on top of your sketch.  Then, use your fabric paint to trace the black "lead" of your stained glass panel.


4.  Once your "lead" dries, turn your glass over so that the lead is on the bottom.  Place your glass panel on top of a sheet of clean, white paper.  Now you're going to paint the colored portions on the back of your glass. (I chose to do it this way so that I wouldn't have to worry about painting over my black lines.)  Create the colored portions by mixing together approximately 1 teaspoon of Mod Podge and 2-3 drops of craft paint.  Mix both together well.  Then, paint the back of your glass panel with the different colors.   


5.  Once your colored paint dries, place your glass back into your frame and secure it.  (I used a couple of pieces of clear tape to make sure the panel stayed put.)   Remember that the front of your stained glass has the fabric paint on it and the back of your stained glass has the colored Mod Podge on it  Also, make sure that you do not scratch the glass panel because the Mod Podge and fabric paint will scrape off.  


And that's it!  Make one of these babies for yourself... or better yet, get your kids to make one as holiday a gift for someone they love.  Happy crafting! 

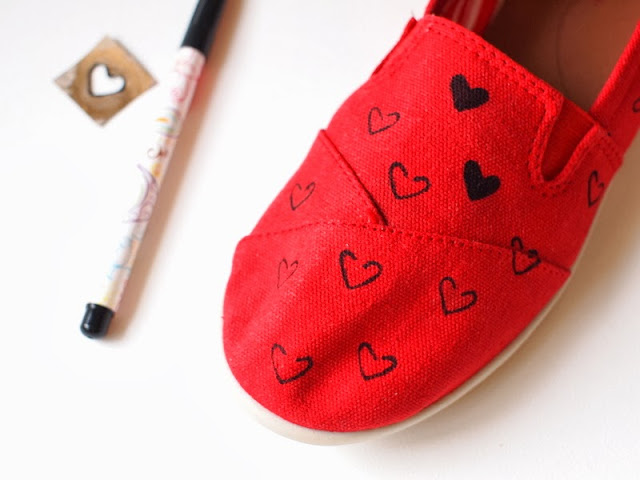
DIY Heart Stenciled Shoes


DIY Heart Stenciled Shoes


DIY Heart Stenciled shoes


As a stay-at-home mom, I often find myself suffering from a terrible illness...  shleppy-clothes-itis.

*sob*  

Yes.  It's true.

Instead of putting effort into my appearance, I often leave our apartment in super comfortable (aka super unflattering) clothes.  Extra large hoodies?  Check.  Shirts with stains?  Double check.  Ratty sneakers?  You betcha.

But I refuse to go quietly into the land of baggy sweats and Snuggies!  Oh no!  I will fight.  And with last weekend's unseasonably warm weather, I took a step in the right direction and crafted this pair of heart stenciled shoes.


These were definitely the cutest things that I wore last week.   I love hearts, so these red shoes were just the perfect little pick-me ups.


Here's how I made them:

Materials to make DIY Heart Stenciled Shoes:

(*Note:  This post includes affiliate links which means that I earn a small commission for every purchase made at no extra cost to you. Thank you so much for your support.)     

  • Canvas shoes (I purchased mine from Walmart.)
  • Fabric markers
  • Cereal box
  • Pencil/Pen
  • Scissors
  • Exacto knife
  • Cutting mat
  • Rags


Directions to make DIY Heart Stenciled Shoes:


stuff rags into your canvas shoes

1.  Stuff your rags inside your shoes.  This will create a sturdier surface for you to stencil.


create a heart stencil from a cereal box

2.  Create a stencil from your cereal box.  (Looking back, I wish I made the area around the heart bigger so that I would have more material to hold onto as I stenciled.)


randomly stencil on your hearts

3.  Place your stencil onto your shoe and trace it.  Keep tracing your shape until your shoe is covered with them.  Then, color your shapes in.  (I tried to make the pattern uniform... but then failed, so I went with a more haphazard look.)

Repeat the procedure with the other shoe.  Wait for your fabric marker to dry, remove your rags, and then enjoy your new custom kicks.

Happy stenciling!

how to stencil hearts onto your shoes