Here's my second completed project: Hungry Caterpillar Bingo
I figured I would need more than a pinata to keep our young guests entertained. I loved playing Bingo as a kid, so I created these Hungry Caterpillar themed bingo boards. I placed different images from Eric Carle's book into each square. Here are 11 different 4x4 Bingo boards that I created:
(Note: Once again, I am not ashamed to admit that I am a big time copycat. I used copied images to create my Hungry Caterpillar invite. This time I copied quite a few of my Bingo images from Patty's blog. Thank you Patty!)
Hungry Caterpillar 4x4 Bingo

Showing posts sorted by relevance for query caterpillar. Sort by date Show all posts
Showing posts sorted by relevance for query caterpillar. Sort by date Show all posts
Saturday, August 25, 2012
Tuesday, September 4, 2012
Hungry caterpillar party prep- Crepe paper caterpillar
Ok, ok, I know what you're thinking. This post looks like a Hungry Caterpillar craft and didn't I announce in my last post that I was no longer going to do anymore caterpillar crafts? Well, yes, that's true. But in my defense, I just wanted to post up this photo of a welcome sign that Tita Tina made for the party. Isn't it adorable? I love his little feet. I just want to tickle them.

I have no idea how she made it (and if anyone out there wants to know, just leave a comment below and I'm sure she would explain everything.)
(By the way, she isn't just a sign maker. She also makes a-mazing cakes.)
I love how a child's birthday party can encourage us to create and craft things.

I have no idea how she made it (and if anyone out there wants to know, just leave a comment below and I'm sure she would explain everything.)
(By the way, she isn't just a sign maker. She also makes a-mazing cakes.)
I love how a child's birthday party can encourage us to create and craft things.
Monday, August 27, 2012
Hungry Caterpillar party prep: DIY Photobooth props
So first we made a Number 1 pinata. Then we made a Hungry Caterpillar themed bingo board. Now it's time for photobooth props!
I've never seen a real live photobooth before. But, I've drooled over so many online that I wanted to try the whole activity out too. (Has anyone out there ever used a photobooth? I think you just provide guests with some props and a nice background, right?) Anyhoo... I'm lucky enough that Tito Ric has real photography backdrops that we can use. I'm just providing the Hungry Caterpillar themed props. Old cereal boxes and cardboard boxes (stolen from our building's garbage pile- yay garbage) were used to create these colorful props. I painted them with craft paint "Eric Carle" style. Here's how a couple turned out:
(Note: I really wanted to take photos of all the props, but hubby reminded me that I should leave some surprise for the guests. So, you'll have to wait to see all the props later!)
I can't wait to see the kids and their parents playing around with the props.
I've never seen a real live photobooth before. But, I've drooled over so many online that I wanted to try the whole activity out too. (Has anyone out there ever used a photobooth? I think you just provide guests with some props and a nice background, right?) Anyhoo... I'm lucky enough that Tito Ric has real photography backdrops that we can use. I'm just providing the Hungry Caterpillar themed props. Old cereal boxes and cardboard boxes (stolen from our building's garbage pile- yay garbage) were used to create these colorful props. I painted them with craft paint "Eric Carle" style. Here's how a couple turned out:
(Note: I really wanted to take photos of all the props, but hubby reminded me that I should leave some surprise for the guests. So, you'll have to wait to see all the props later!)
 |
| The mask looks like a bunny... but it's meant to be the hungry caterpillar. |
Thursday, August 2, 2012
Hungry Caterpillar party prep: The invite
In one more month Baby Chuck will be turning one. We're celebrating with a Hungry Caterpillar themed birthday party. I'm super excited because hubby's aunt and I are going to make a lot of things by hand. I'm not sure how everything will turn out... but I know we'll learn a lot in the process.
(Note: Unfortunately, I can no longer send out the powerpoint slide that I used. My computer died awhile back and this was one of the files that I lost. )
(Note: Unfortunately, I can no longer send out the powerpoint slide that I used. My computer died awhile back and this was one of the files that I lost. )
 |
| Note: I'm a copycat. I found these images and phrases on the internet and pasted them onto a ppt slide. :) |
Monday, September 3, 2012
Hungry Caterpillar party prep: DIY birthday banner
Ok, this will be the last of the party DIYs, I promise! With the party only a couple of days away, we round off our DIY series with a Hungry Caterpillar birthday banner:

It was really simple and fun to make. I cut out various shapes from cereal boxes. Then, I just painted them with craft paint "Eric Carle" style and used Sharpie markers to write the letters.
To see all the items we made for the party, click here

It was really simple and fun to make. I cut out various shapes from cereal boxes. Then, I just painted them with craft paint "Eric Carle" style and used Sharpie markers to write the letters.
To see all the items we made for the party, click here
Thursday, September 13, 2012
Hungry Caterpillar Party Part 3
Here are the last of my party photos.
(We didn't have an actual photo-booth set up, but the guests were still able to play around with the props. Don't they look so gosh darn cute?)
(We didn't have an actual photo-booth set up, but the guests were still able to play around with the props. Don't they look so gosh darn cute?)


Thursday, August 30, 2012
Hungry Caterpillar party prep: DIY multicolor crayons
I struggled with what to put in the children's goodie bags. At first I was going to give them lollipops because that went along with the theme of the book. But then I remembered that they were already going to get candy after bashing the pinata. Images of screaming children on candy highs filled my mind, so I went another route: DIY multicolor crayons. (It sort of goes with the theme, right? Colorful crayons.... colorful Eric Carle artwork? Ok...maybe it's a stretch... Alright, you got me. I just wanted to try this DIY out and I needed an excuse... )
Anywhoo... here's what I did:
(1) I found a bunch of old crayons, ripped off their paper covers, and broke them up.

(3) Place the crayons into a 250 degree oven. Bake for about 10-15 minutes (depending on how big your crayon chunks are). Watch them as they bake. Take them out when the top layer is liquidy.
(4) Once melted, take the tray out and let your melted wax cool and harden. (Mine took about 15 minutes to solidify.)
To see other things that we made for the party, click here
Anywhoo... here's what I did:
(1) I found a bunch of old crayons, ripped off their paper covers, and broke them up.
- Note 1: My mom actually found these crayons at home...so that means they're at least 20 years old... ehhhh.... I think they're still good)
- Note 2: I had a tough time ripping off the covers. So hubby and I ended up using a scissor to slice the paper right off. Be careful! I sliced my finger.
- Note 3: It was tough breaking crayons. (Hmm, I sense a theme here. I should probably go to the gym and work out my arms). I ended up using my trusty pair of scissors and cutting the crayons up. You could probably chop the crayons up too. But I didn't want to get wax on my knives or cutting board.
- Note 1: You probably don't want to do this with a beloved tray. The wax stains the silicone.
- Note 2: I placed the silicone molds on top of a baking dish because I was afraid of spilling melted wax. I spilled wax anyway...but at least it didn't get onto my floor.

(3) Place the crayons into a 250 degree oven. Bake for about 10-15 minutes (depending on how big your crayon chunks are). Watch them as they bake. Take them out when the top layer is liquidy.
(4) Once melted, take the tray out and let your melted wax cool and harden. (Mine took about 15 minutes to solidify.)
- Note: Melted crayons smell bad. Really bad. Open a window. Wear a gas mask. Do whatever you need to feel ok with this.... I kept reminding myself that crayons are non-toxic....*cough cough*
- Note: I placed mine in the freezer for a bit before popping them out. Some other blogger said to do that, but I don't think I really had to.
 |
| Voila! An army of rainbow crayons ready to color the world! Muah ha ha ha. |
To see other things that we made for the party, click here
Wednesday, September 12, 2012
Hungry Caterpillar Party Part 2
 |
| Click here for directions to make your own fruit balloon garland |

 |
| Special thanks to brave hubby for holding the pinata while kids swung wildly with their bats. |
 |
| I found it hilarious that the kids brought multiple bats to hit the pinata. |


I initially didn't want to throw Baby Chuck a party. (Does that make me a bad mommy? Hopefully not.) I didn't want a birthday party because I figured Baby Chuck wouldn't really remember anything... so why spend the money or put the effort in? (Ay, I'm so cheap.) But then I changed my mind after talking with some relatives. It only took a bit of convincing and Pinteresting before I was on-board. (Anytime there's a craft to be made, count me in!)
Looking back I'm really glad that we did it. Hubby and I got to celebrate the fact that we kept a baby alive for a whole year. Wowzers. Tita Tina, Ana, and I got a chance to craft. Yes! Baby Chuck will have lovely photos to look at one day. Hooray! And our young guests got a chance to let loose and enjoy themselves. Score!
You know what? Here's my deep thought of the day:
There are so many tough and sad things in this world. Life would be better if we threw more parties and celebrated.
(Thanks Sam for taking these beautiful photos.)
Monday, September 10, 2012
Hungry Caterpillar party part 1
Hi everyone!
Last Saturday we held Baby Chuck's 1st birthday party. I was a tad bit stressed out with all the planning, but everything turned out well at the end. Hooray! Everyone seemed to have fun and enjoy themselves. Thanks to everybody who helped out with the decorations, games, and food!!!
Because I was running around like a chicken without its head, I didn't get a chance to get too many photos. Here are some shots that hubby managed to snap of our decorations and food:
 |
| Made by Tita Tina |


 |
| Made by Tita Tina and Ana (Click here to see more amazing cakes!) |
 |
| Made by Tita Tina and Ana |
 |
| Made by Grace |

 |
| Click here for directions to make your own multi-colored crayons |
Friday, April 15, 2016
Playful and Easy Mathematics with Building Toys (And our favorite math books!)
Wanna know a secret? In college I majored in Engineering and minored in math. Eek. Surprised? Well...it's true! I'm a bit rusty now... but I will always have a soft spot for mathematics. There was something about solving a difficult problem that was so thrilling and satisfying.
Now that my son is older, my husband (who is also a math lover) and I have been trying to help him to love math too. With a new baby at home, I just haven't had time lately to plan math crafts and activities. (Mucho props to all you homeschooling mamas out there... don't know how you do it!) But, I've been giving myself a bit of slack and telling myself that it's ok. We've still been learning math together... just in a more open-ended and playful way.

Now that my son is older, my husband (who is also a math lover) and I have been trying to help him to love math too. With a new baby at home, I just haven't had time lately to plan math crafts and activities. (Mucho props to all you homeschooling mamas out there... don't know how you do it!) But, I've been giving myself a bit of slack and telling myself that it's ok. We've still been learning math together... just in a more open-ended and playful way.
Playful Math Learning with Kids

This post contains affiliate links. Thank you for your support! For my full disclosure, click here.
Wednesday, April 20, 2016
Artsy Origami Butterfly Stick Toys
These artsy origami butterfly stick toys are such a fun spring craft to make with the kiddos. You get to paint and decorate... and then you get to fold... and then you get to play!
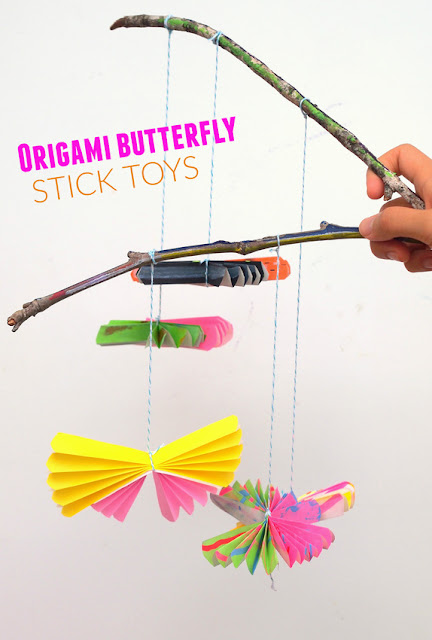
Artsy Origami Butterfly Stick Toys

This post contains affiliate links. Thank you so much for your support! For my full disclosure policy, click here.
Monday, November 26, 2012
Cakesgiving
Are you more of a sweet or savory person?
I've always been a savory type of gal. I like eating sweets occasionally, but I always have room in my tummy for salty snacks.
(By the way, sorry hubby for devouring that bag of chips the other day.)
Anyway, back to this post. This Thanksgiving (which shall hereafter be called "Cakesgiving"), everything changed. Our aunt (yah, the same one that made Chuck's Hungry Caterpillar cake) fully embraced our new dietary restrictions and made a gluten-free triple layer carrot-cheesecake-carrot cake.
Oh.
My.
Goodness.
One bite and I felt myself leaving my body and floating away to sugar heaven.
Carrot cake? Ooh yeah, it was delicious and moist.
Cheesecake center? Um, yes please. It's was creamy with just a bit of tang.
And that cream cheese frosting? To. Die. For.
(Just thinking about that cake now makes my toes curl.)
It was really the best cake I've ever had.
Ever.
Ever ever.
Phew.
I don't know about you, but it's time for me to cool myself off with a nice cold glass of milk.
Happy (yummy) Monday!
I've always been a savory type of gal. I like eating sweets occasionally, but I always have room in my tummy for salty snacks.
(By the way, sorry hubby for devouring that bag of chips the other day.)
Anyway, back to this post. This Thanksgiving (which shall hereafter be called "Cakesgiving"), everything changed. Our aunt (yah, the same one that made Chuck's Hungry Caterpillar cake) fully embraced our new dietary restrictions and made a gluten-free triple layer carrot-cheesecake-carrot cake.
Oh.
My.
Goodness.
One bite and I felt myself leaving my body and floating away to sugar heaven.
Carrot cake? Ooh yeah, it was delicious and moist.
Cheesecake center? Um, yes please. It's was creamy with just a bit of tang.
And that cream cheese frosting? To. Die. For.
(Just thinking about that cake now makes my toes curl.)
I never got a chance to get the recipe. Rats. But fortunately, I did take tons of photos of her making it. (This was me "helping" out with Thanksgiving preparations.) So, dear reader, I present to you some delicious cake photos.
(Warning- If you're on a diet or thinking about going on a diet, please avert your eyes. Read another post. Take a walk. Eat a rice cake. Just turn away and don't look at the photos.)
(Warning- If you're on a diet or thinking about going on a diet, please avert your eyes. Read another post. Take a walk. Eat a rice cake. Just turn away and don't look at the photos.)
 |
| Ooh, mix it! |
 |
| Yeah, crack those eggs... |
 |
| Ooh, sugar... |
 |
| Softened cream cheese... yuuuuuuuum.... |
 |
| Take a whiff. Can you smell it? Yup, that's warm carrot cake fresh from the oven... |
 |
| I'm totally drooling. Oh baby, whisk that icing! |
 |
| Oh. My. Goodness. My pulse just quickened... |
 |
| Ack. My toes are curling. |
 |
| If only they I had taste-o-vision. Then I could reach in and take one more delicious bite. |
It was really the best cake I've ever had.
Ever.
Ever ever.
Phew.
I don't know about you, but it's time for me to cool myself off with a nice cold glass of milk.
Happy (yummy) Monday!
Thursday, August 23, 2012
Hungry Caterpillar party prep: DIY Number Pinata
I just realized this week that September is right around the corner. Eek! Summer is slipping through my fingers. Nooo!
Baby Chuck's birthday party is almost here. I have all these marvelous DIY plans dancing in my head, but I have yet to fully complete one. Fortunately, Kim is super crafty and creative. I'm mucho thankful that she was able to help out.
Here's our first birthday party project: The pinata! Ole! (Note: I've never hit a pinata before, but the whole idea seems very fun. What? You get to hit something with a big stick? And it's ok? And it spits out candy? Sign my kid up!) After looking through pages and pages of pinatas, I skipped the paper mache route in favor of cardboard (using this awesome set of directions). I'm not sure how sturdy the structure will be since we used flimsy cereal boxes. Luckily, only a couple of young kids will attend our party, so I think it'll be ok. *Crosses fingers*
I'm not going to lie. It was loads of fun to make, but it took a looooong time. We could only work at night when Baby Chuck was sleeping. (Unfortunately, that meant that we were both also exhausted too.) Having Kim as myslave helper really helped. If you were to try this project, I recommend that you get yourself a Kim too.
Here are some photos from our efforts:


Now I just have to fill this baby up and then we can see it in action.
Baby Chuck's birthday party is almost here. I have all these marvelous DIY plans dancing in my head, but I have yet to fully complete one. Fortunately, Kim is super crafty and creative. I'm mucho thankful that she was able to help out.
Here's our first birthday party project: The pinata! Ole! (Note: I've never hit a pinata before, but the whole idea seems very fun. What? You get to hit something with a big stick? And it's ok? And it spits out candy? Sign my kid up!) After looking through pages and pages of pinatas, I skipped the paper mache route in favor of cardboard (using this awesome set of directions). I'm not sure how sturdy the structure will be since we used flimsy cereal boxes. Luckily, only a couple of young kids will attend our party, so I think it'll be ok. *Crosses fingers*
I'm not going to lie. It was loads of fun to make, but it took a looooong time. We could only work at night when Baby Chuck was sleeping. (Unfortunately, that meant that we were both also exhausted too.) Having Kim as my
Here are some photos from our efforts:
 |
| I added thicker cardboard to reinforce my flimsy ones. |

 |
| This was all we were able to accomplish the first night. |
 |
| Note the ice-cream in the background. We needed to keep our energy up. |

 |
| We started from the bottom and then slowly worked our way up. |
 |
| Delirium sets in. |
 |
| This is all we accomplished the second night. |
 |
| And then when I work up the next morning , our pinata was magically completed! Just kidding, we finished it after another night of work. |
Now I just have to fill this baby up and then we can see it in action.
Wednesday, May 4, 2016
3D DIY Butterfly Cutout Wrapping Paper
Are you a butterfly lover? Do you know a butterfly lover? Then you're going to love today's 3D butterfly cutout wrapping paper. 3D? Oh yes. The wings pop up, making this the ultimate spring craft!

DIY 3D Cutout Butterfly Wrapping Paper!

This post contains affiliate links. Thank you for your support. For mu full disclosure policy, click here.
Subscribe to:
Posts (Atom)